Introduction
Welcome to the documentation page of the Jeedom Tesla plugin !
Thanks to it, a Tesla owner can access to her/his car and interact with it, based on Tesla API.
Also, this plugin provides a panel to track all day long (or on demand) on a graph the range of your vehicle:
You want your car 90% charged at 7AM ? Create a scenario that will schedule the charge at the right time !
You will find the details of all versions in the Change log.
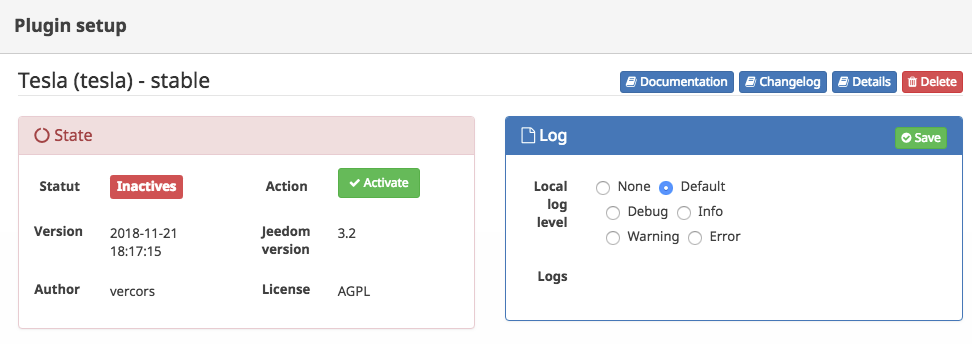
Plugin setup
The setup is quite simple. Once downloaded, the user needs to activate it and follow below instruction to connect it to her/his car(s).
The plugin will retrieve all Tesla associated with your account and automagically create the corresponding Jeedom equipmenents.
Tip
This plugins requirs that your Tesla is online to properly work.
First check that the Tesla app on your smartphone is able to connect to it.
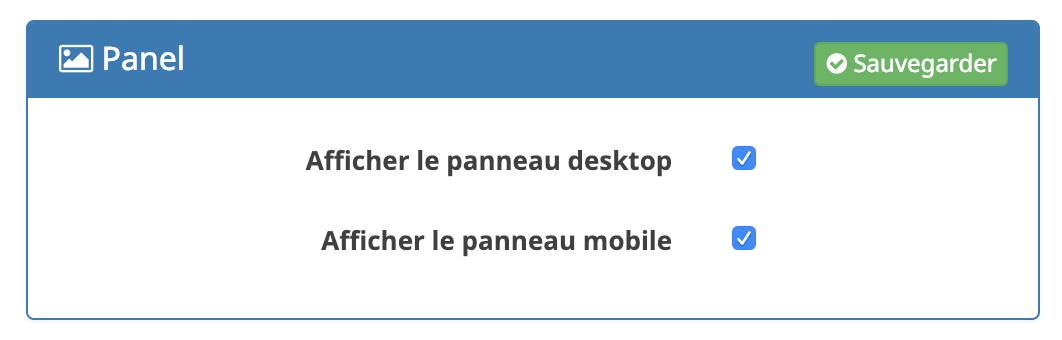
User needs to check the following settings View the desktop panel and Show mobile panel to have access to the Range Tracking panels:
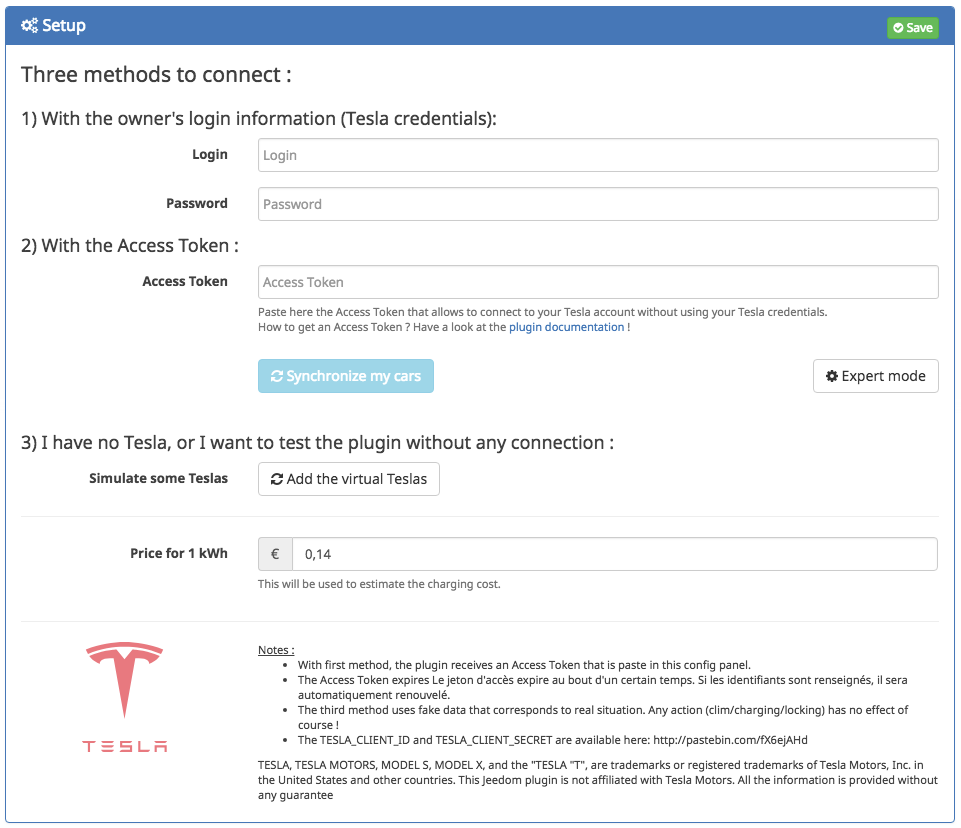
The two methods to connect are::
1) With your owner’s login informtaion (Tesla credentials):
- Login : Enter here the login of your Tesla account
- Password : Enter here your password
Note
Your credentials are only used for connexion phase to get an Access Token.
Given the Self Hosted features Jeedom is running on, your credential are only stored locally to the machine that ran your Jeedom.
However, you could want to remove email/password info after first sync, or keep them for the next time the plugin will require authentication (when Access Token expires).
2) With an Access Token:
- Access Token : Paste here an Access Token. If you have none, you can get one running the php code on your jeedom machine:
$ php /var/www/html/plugins/tesla/scripts/tokenTesla.php <login> <password>

Votre jeton d'accès à votre compte Tesla : 49329effb7d381c945fbf7e6b3e02691e746904f47ebdb2a3e54d49c93473e80
Note
Using this method will work until Access Token expires. A clic on ‘revoke my access token’ will clean up any security credentials associated with this authorization. It’s like doing a log out on Tesla Servers.
After method 1 or method 2, you can click on “Synchronize my cars” button. Any cars that is not present as a Jeedom equipmenet will be created.
Virtual Teslas
If you want to test the plugin, or you don’t have any Tesla (yet), you can create some virtual Teslas (Model S et/ou Model X).
Fake cars will appear after clicking on Add the virtual Teslas button. Some test data will be used to display different situations. Of course any action on these fake Teslas (heating/charging/locking) will have no effect.
Other config settings
- Price for 1kWh (euro) : Required to estimate the charging cost, the number of km you can do with 1euro and the price for 100km. The default value is
0.14. - Tesla Client ID et Tesla Client Secret : These public keys are required to access the Tesla Server. They are already filled but you may want to change them.
Vehicle setup
Once the plugin is setup and the cars added, you can modify each of your cars: make it visible/enabled and attached to a Jeedom object (her the garage):

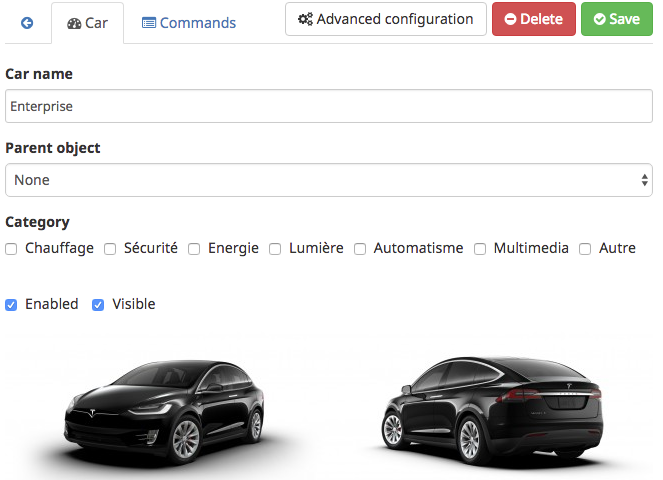 The
The energy mode on the Range Tracking requires some info about the battery:
- Capacité batterie : The capacity of the battery (kWh)
- Autonomie : How many km the car can do at 100% of charge
- Consommation typique : In theroy, it is
Capacité batterie X 1000 / Autonomie. Can be updated according to usage. - Affichage : The default display. Choices are:
EnergieorDistance.
Info and action commands associated to each Tesla are the following:
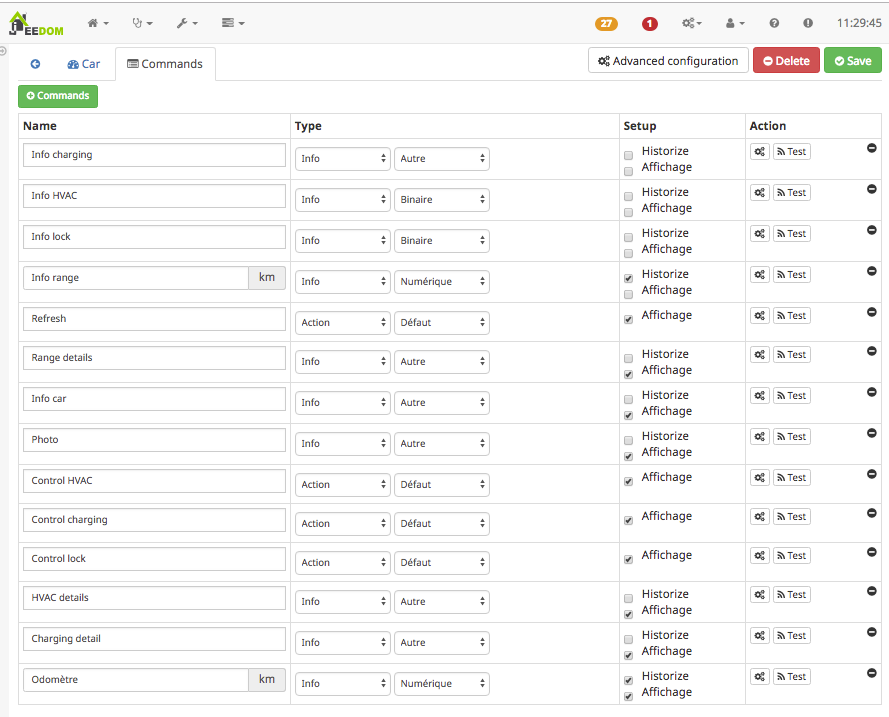
Commands info
| Command | Description |
|---|---|
| Photo | Display a picture of the Tesla. |
| Info awake | Tells whether the car is asleep (0) or online (1). |
| Info ideal range | Provide the ideal range (km or miles). |
| Info rated range | Provide the rated range (km or miles). |
| Info range | Provide the range in km or miles. |
| Info HVAC | Tells whether the HVAC is on or off. |
| Info interior temp | Provide temperature inside the car. |
| Info charging | Tells if the car is currently charging or not. Possible values are { Charging, Stopped, Disconnected, Complete, Scheduled, Driving }. |
| Info battery level | provide battery level (%). |
| Info charging limit | Provide value of charging limit (%). |
| Info lock | Tells whether the car is locked or not. |
| Info frunk | Tells whether the frunk is locked or not. |
| Info trunk | Tells whether the trunk is open or not. |
| Info sunroof | Tells whether the sunroof is open or not. |
| Info heure de départ de recharge | Tells when the charging needs to start (Hmm format). |
| Info heure de fin de recharge | Tells when the charging shall end (Hmm format). |
| Odometer | Provide value of odometer (km/miles). |
| Info car | Display info (title and subtitle) about current. Example Driving 68km/h, Charging scheduled at 22h50, Parked, Supercharge, … |
| Range details | Display a battery graph. |
| Charging details | Display details about the charging. |
| HVAC details | Display details about HVAC (driver, passenger, inside and outside |
| Data details | For debugging purpose - display a 64bits encoded buffer of the output of the car minus any personally identifiable info (VIN/id/GPS/…). |
temperatures).
Commands action
| Command | Description |
|---|---|
| Control charging | Start/stop/estimate charging when cable is engaged. |
| Control the charging limit | Set the charging limit (%). |
| Control HVAC | Start/stop HVAC. |
| Control temperatures | Set temperatures for driver and passenger. |
| Control lock | Lock/unlock the car doors. |
| Control the frunk | Lock/unlock the frunk. |
| Control the trunk | Lock/unlock the trunk. |
| Control the sunroof | Lock/unlock the sunroof. |
| Contrôler l’heure de fin de recharge | Set the time when the charging shall stop (format Hmm). |
| Control the range tracking | Start/stop the range tracking. |
| Refresh | Refresh the jeedom panel. |
| Wake up | Try (3 times with 5 sec between two attempts) to wake up the car. May be usefull in context of a scenario. Automatically update the value of Info awake. |
Tip
Each of these actions can be used in Jeedom scenarios.
Car display
Most of the listed commands has a specific template. The default presentation for a car is as follow : :
Desktop version:
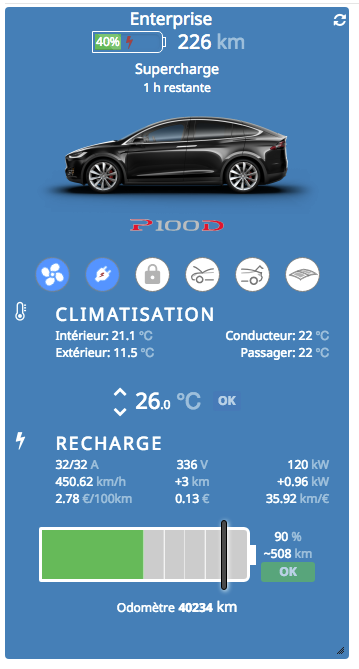
Mobile version:
For example, if user does not want to display the picture and HVAC details, he/she needs to uncheck the "Display" toggle in car settings.
By default, the odometer is historised. This can be useful to display a graph of past km.
Control HVAC
| Button | Description | A clic on this bouton will … |
|---|---|---|
 |
HVAC is stopped | … start HVAC |
 |
HVAC is started | … stop HVAC |
User can set the driver and passenger temperature using a specific widget, described in following animation:

Note
Due to a limitation in the current version of the Tesla API, we can set different temperatures to driver and passenger only if SYNC is unselected in the car.
Control locks, trunks and sunroof
| Button | Description | A clic on this bouton will … |
|---|---|---|
 |
The car is locked | … unlock the doors |
 |
The car is unlocked | … lock the doors |
 |
The front trunk is closed | … unlock the frunk |
 |
The front trunk is open | … have no effect |
 |
The rear trunk is closed | … unlock the trunk |
 |
The rear trunk is open | … close the trunk |
 |
The sunroof is closed | … slightly open the sunroof |
 |
The sunroof is open | … close the sunroof |
Control the charging
| Button | Description | A clic on this bouton will … |
|---|---|---|
 |
The charging cable is not engaged | … have no effect |
 |
The charging is scheduled | … start the charging |
 |
The charging is running | … stop the charging |
 |
The charging has been manually stopped | … resume the charging |
 |
The charging is complete | … have no effect |
 |
The charging state is unknown | … have no effect |
Controle the range tracking
| Bouton | Description | A clic on this bouton will … |
|---|---|---|
| The range tracking is stopped | … start the range tracking | |
| The range tracking is running | … stop the range tracking | |
| The range tracking is running and cannot be manually stopped (managed by Jeedom, see note below) | … have no effect |
Note
If in the tesla plugin configuration panel the Automatic Management is activated, Jeesdom will restart the daemon if it detects it has been stopped. Thus it is advised to deactivate the Automatic Management.
User can set the charging limit using a specific widget, as described in following animation:

Health
To mae sure the Tesla plugin is doing well, the user can run a series of test in the Health panel (menu Analyze / Health).
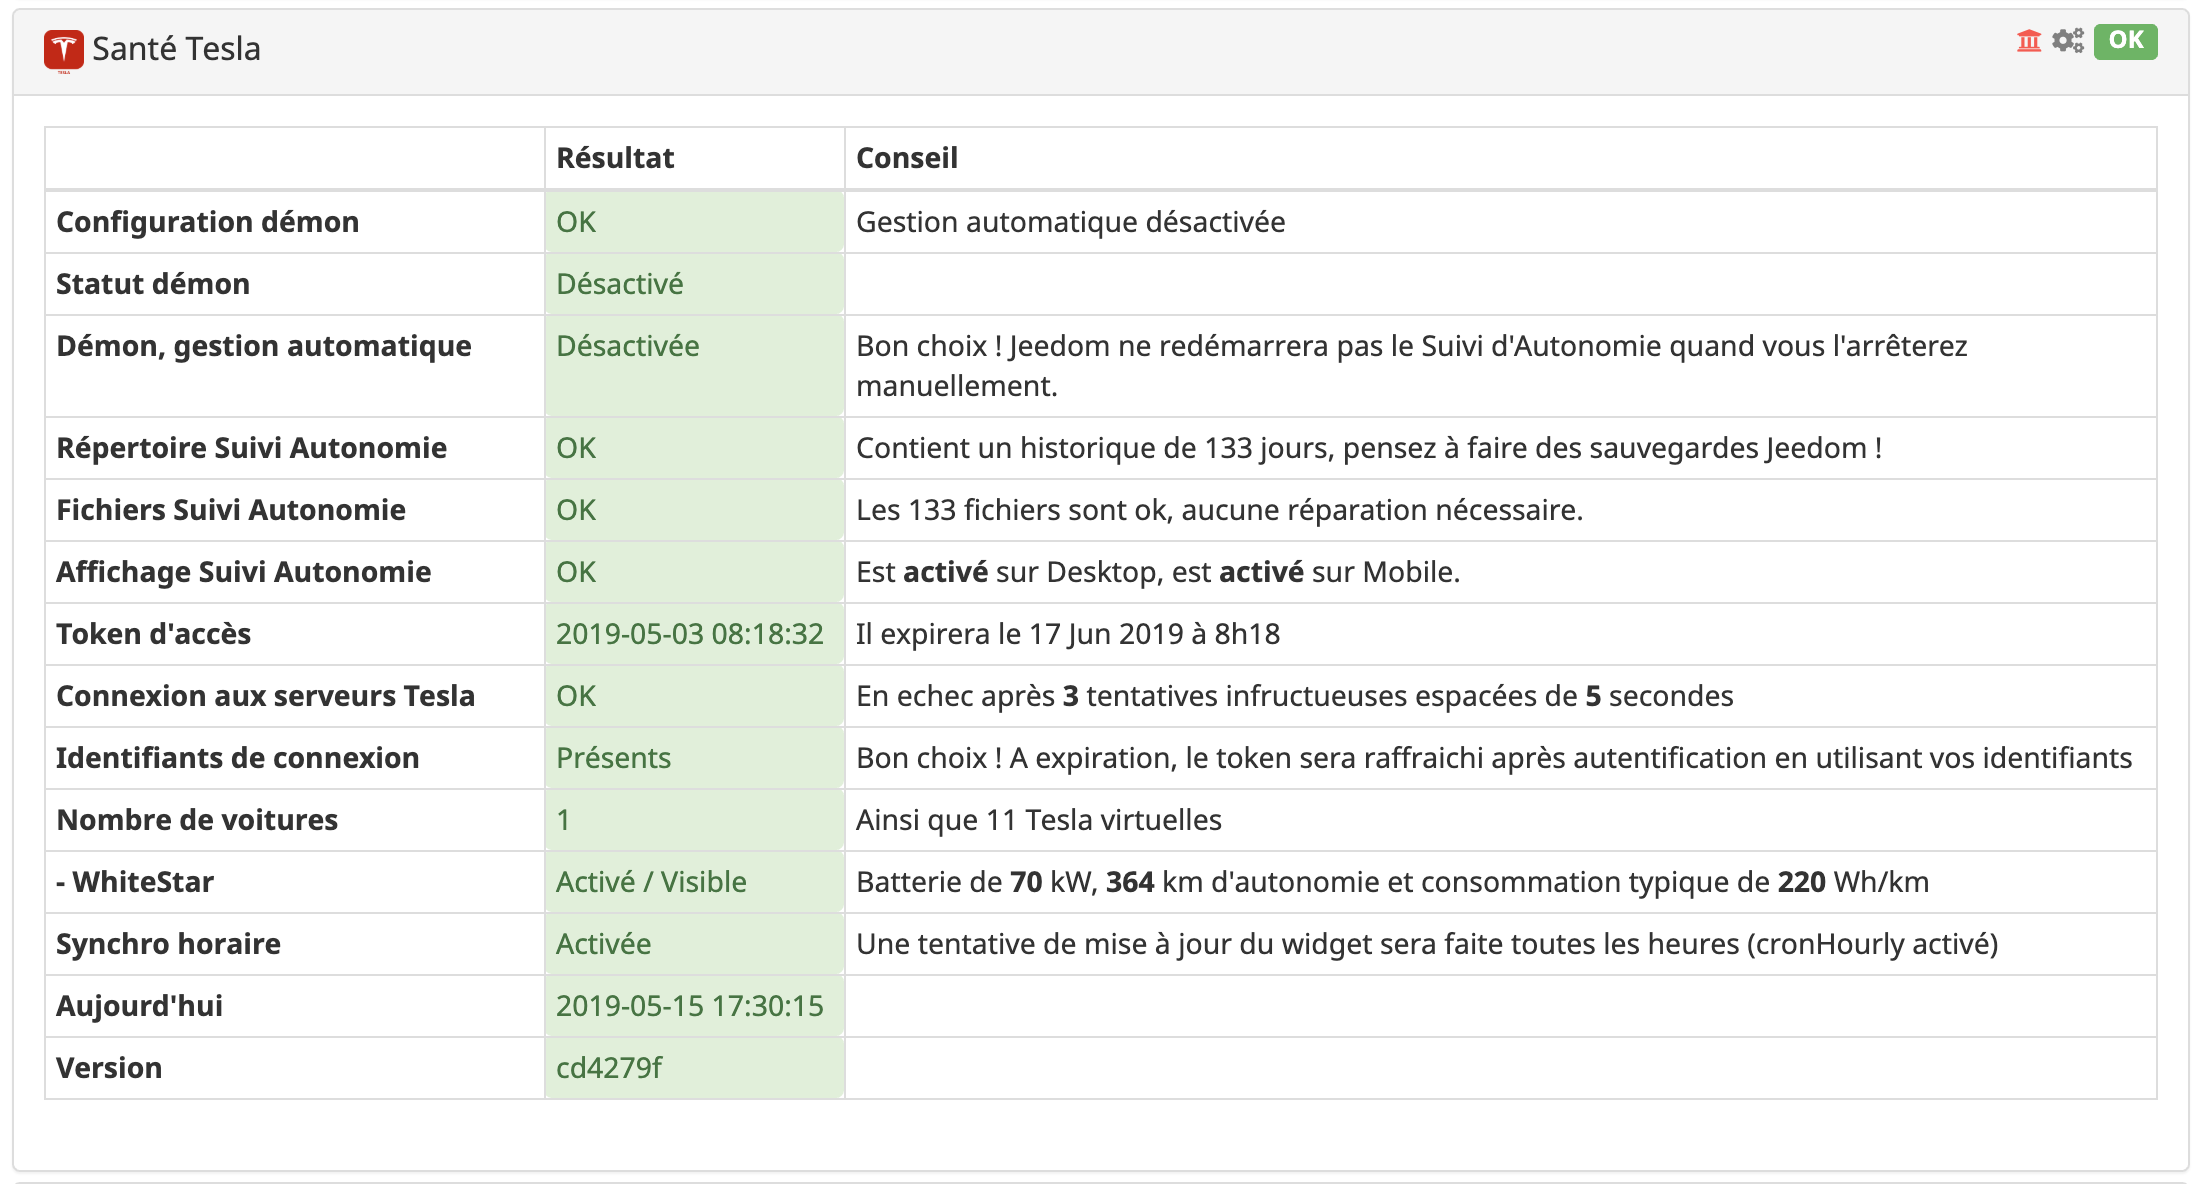
** Note**
If a permission issu is detected on tracking files, it will be fixed.
Scenario
Scenario examples:
-
Set the charging limit to 100%:

-
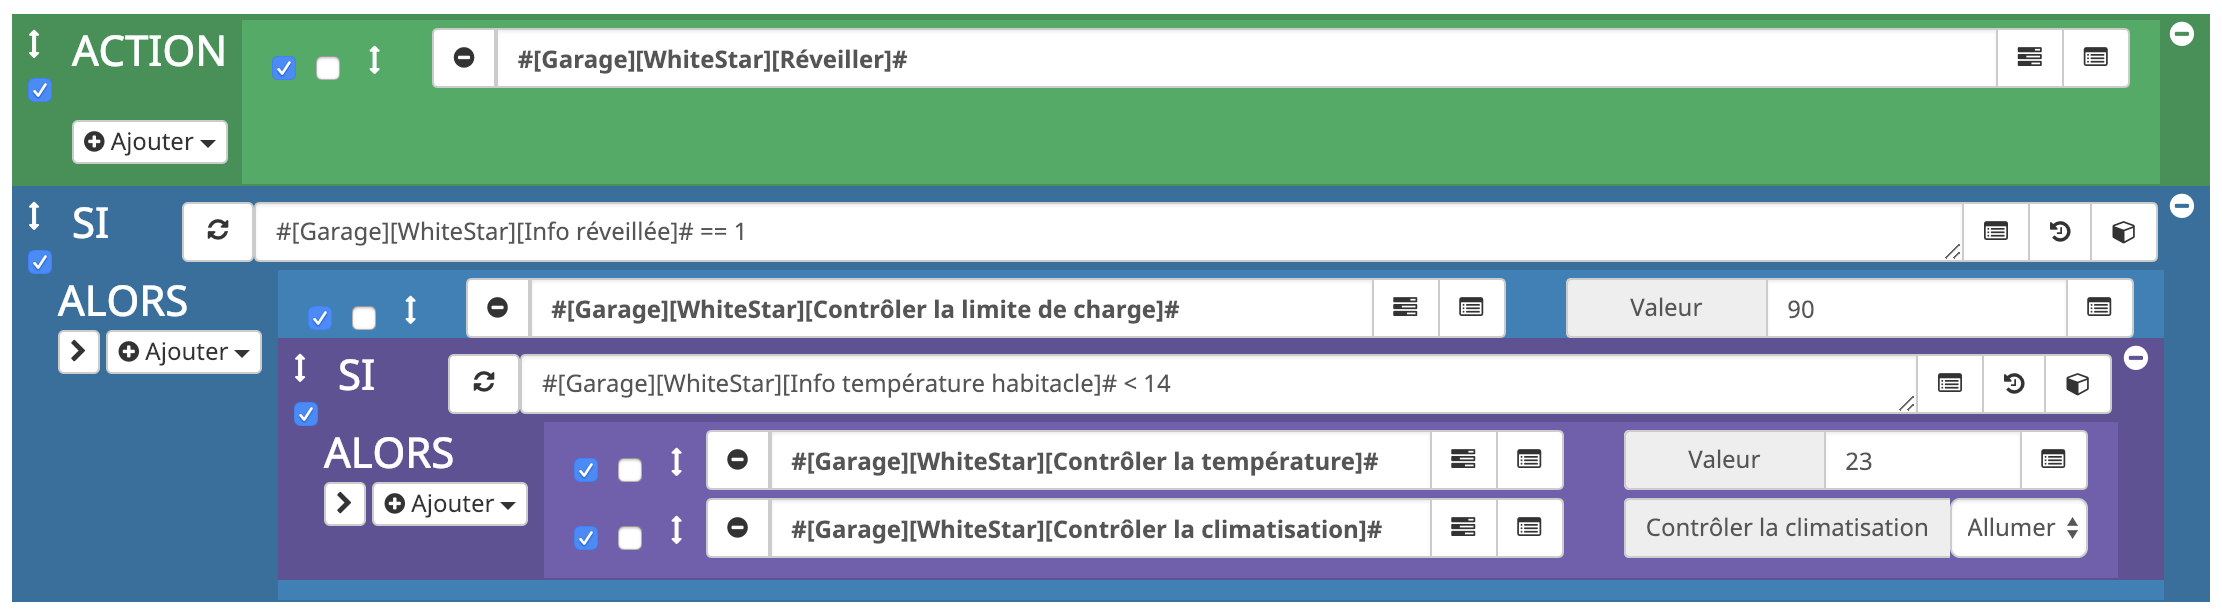
Once the car is online, set charge limit to 90% and set temp to 23°C and starts HVAC if inside temp is lower than 14°C:
-
Set the charging start time to have 90% charged at 7AM !
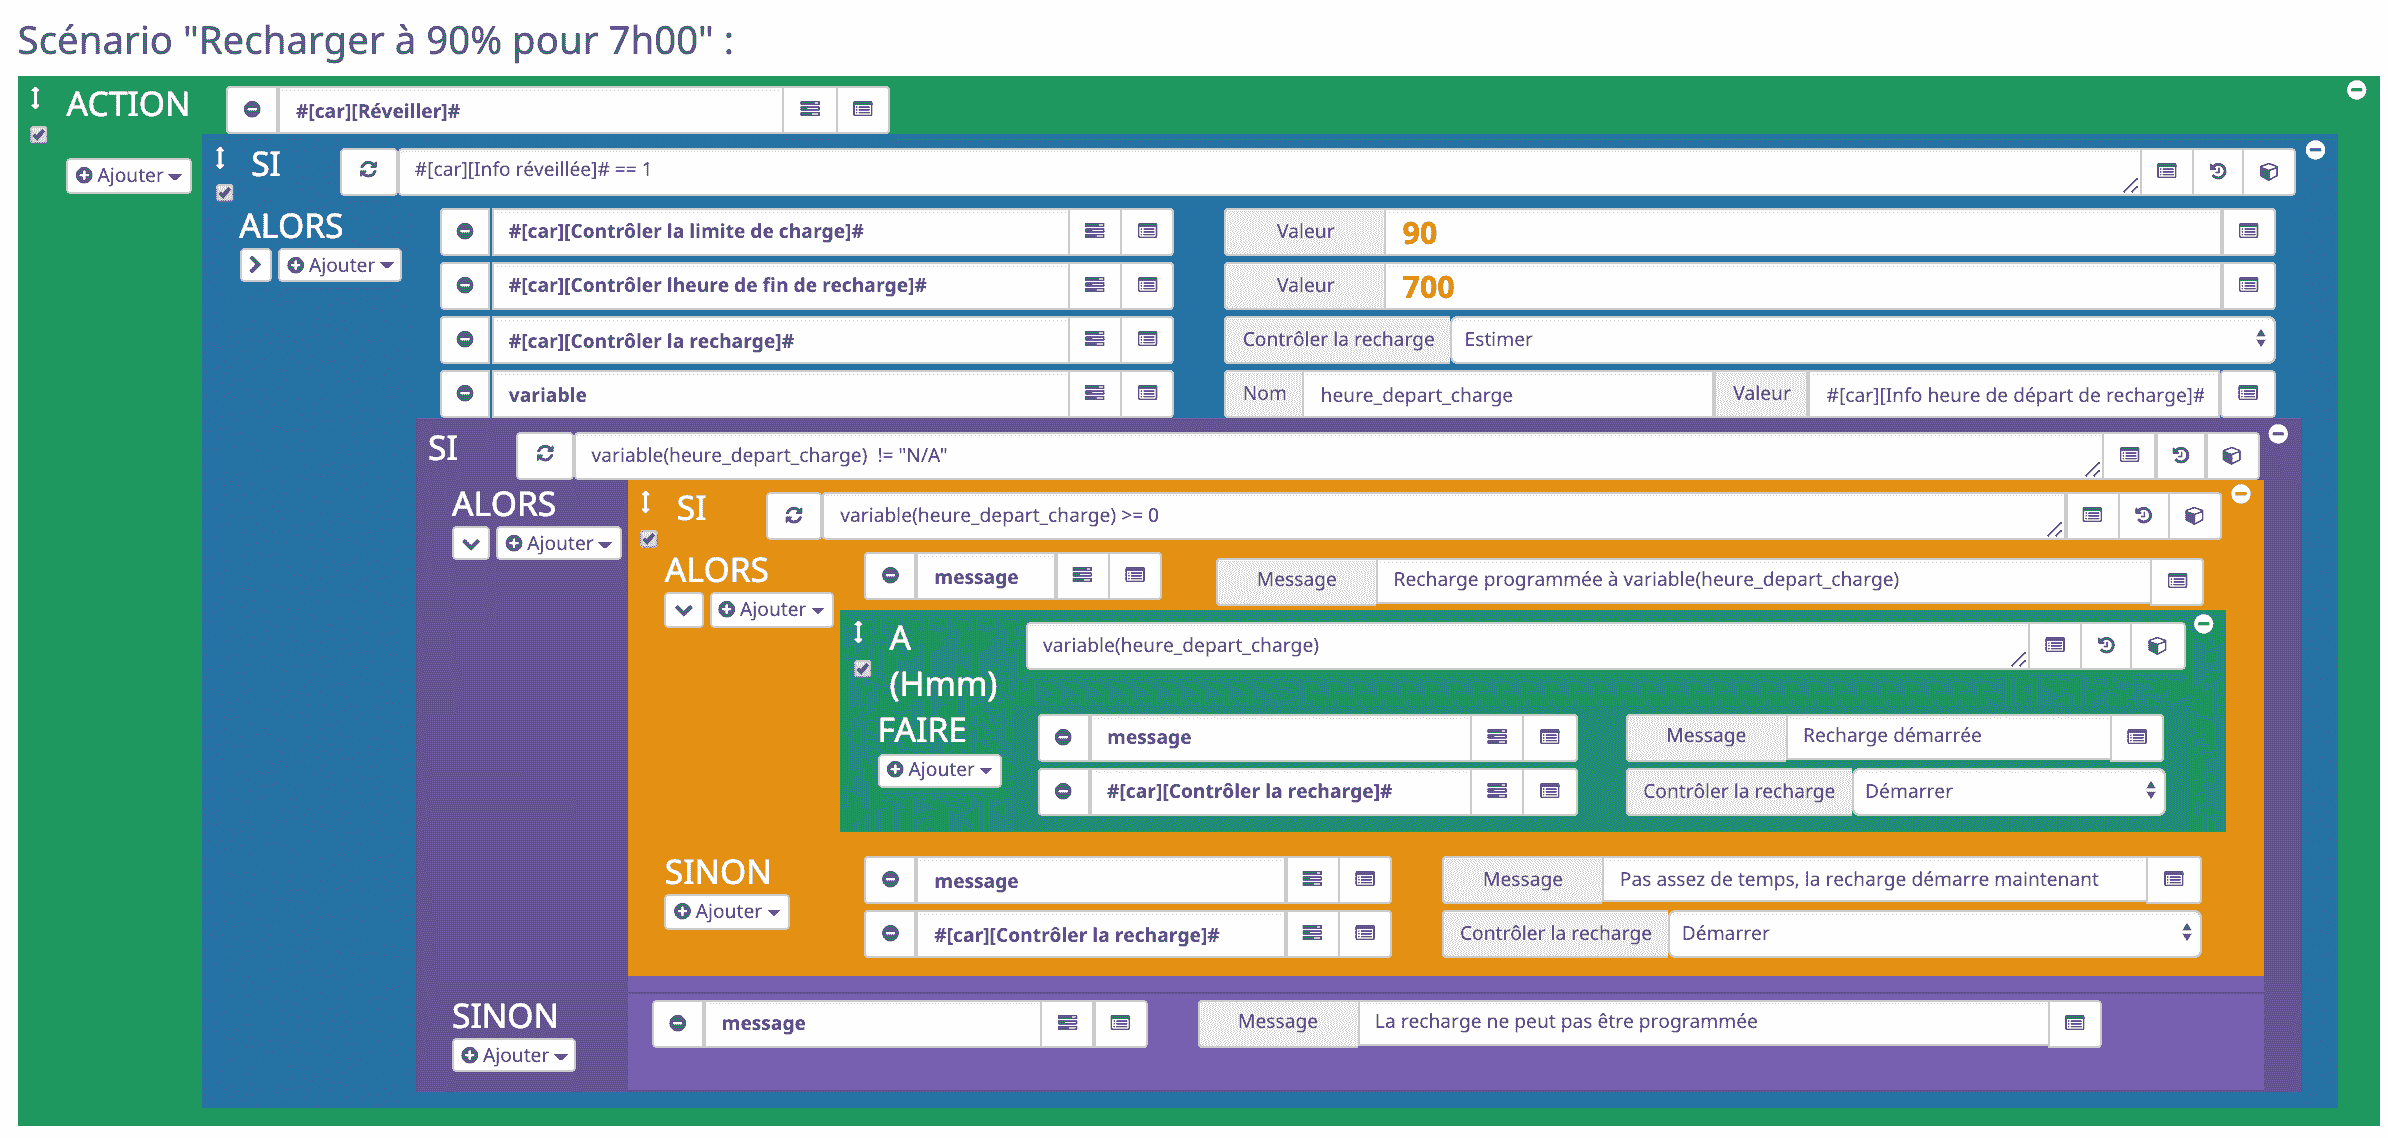
Note
To return the specific starting time, a small charging needs to be ran. During it the charging estimates will be provided.
If the car is not ready for charging, the command Info heure de départ de recharge returns
N/A.If the charging duration is smaller than the difference between now and the charging end time, the command Info heure de départ de recharge returns the starting time (format
Hmm) when charging can be scheduled.Otherwise the command Info heure de départ de recharge returns the starting time prefixed with
-.Examples: we want to have car 90% charged at 7AM:
- It is 10:30PM when the scenario is launched. The charging duration is estimated to 5 hours and 30 minutes. The command Info heure de départ de recharge returns
130(i.e: start the charging at 1:30AM)).- It is 10:30PM when the scenario is launched. The charging duration is estimated to 12 hours. The command Info heure de départ de recharge returns
-1900(i.e: start the charging at 7PM, but it’s too late !)- It is 10:30PM when the scenario is launched, but the car is not plugged. The command Info heure de départ de recharge returns
N/A.
Range tracking
The Range Tracking panel provides all required info to the driver to help her/him understand how range or energy evolves when she/he is driving the car. All enabled Teslas configured in Jeedom can be tracked.
This tool retrieves data from Tesla servers via a cron job that is manually started/stopped from the panel. It provides statistics on each steps : driving, charging and parking. All retrieved data is stored on the local drive of your Jeedom server.
A calendar allows user to display graphs from a specific day.
Tips
The mobile version of the panel can be used while driving : a live mechanism updates the graph when new data arrives !
To automagically display the
Teslaview on Mobile version, you can defineTeslaas the defaultMobileview in Jeedom profile configuration :User menu->Admin Profil->Interface tab.The range tracking can be programmatically started and stopped thru scenarios
Setup
By default, the cron job is not started.
When user clics on Start Recording button, the cron job retrieves data every minute. These data will be used to create the graphs and will calculate statistics.
When user clics on Stop Recording button, the cron job stops all data retrieval. You can still display recorded graphs but the activity with Tesla Server is donw.
Notes
When recording is started and displayed graph is the graph of the day, the panel displays
livedata that are updated on the fly.At first launch, it may takes several minutes before first points appear on the graph.
Example Distance
The example below corresponds to a real trip made on 2019, January the 5th. This trip is mainly split in 4 stages:
km 0tokm 15: road - altitude: from 1100m to 1000m.km 15tokm 30: road - altitude: from 1000m to 250m.km 30tokm 50: highway - altitude: from 250m to 400m.km 50tokm 65: road - altitude: from 400m to 500m.
![]()
- Horizontal axis is timeline.
- The left vertical axis represents:
- the traveled milleage in black, Note: the more the curve goes up, the faster the speed.
- the range at the beginning of the trip in dashed
- the current evolution in blue.
- When the HVAC is on, the curve turns to violet.
- The right vertical axis represents:
- the difference between the range at the beginning of the trip and the current range without mileage traveled removed. The curve is green when there is a gain, and orange when we observe a loss.
- the value of the charger power when the car is charging
The table below lists all the different stages of the day. User can clic a specific stage to zoom the graph. A clic on the footer resets the zoom and displays the whole day.
![]()
- The
efficiencycorresponds to the ratio between the gain/loss and the traveled mileage. In general small trips have bad efficency. - The 3 buttons on the top right of the table allow the user to filter the table. For example she/he can display only the parking stages to see how range evolves when car is not moving (vampire drain)
Example energy
Since version 1.5.0, user can switch from distance mode to energy mode clicking on the slider in the table.
In this mode, the green/orange curve is replaced by another one that describes the energy consumption, with three zones:
- overconsumption when energy is greater than typical range (here
220Wh/km) , - underconsumption
- production when accumulated energy is negative.
![]()
The table describe info about energy: in green when average consumption of the trip was lower than typical range and red otherwise.
Notes
- You can avoid unintentional energy consumption by minimizing the range tracking. Keep it off when it is not needed (on nights or during long parking times)
FAQ:
-
How do I upgrade my equipment after a plugin upgrade ?
At plugin upgrade, the plugin automatically synchronizes your car(s). However, it might not properly work (car not available for example), thus you simply need to click on
Synchronize my carsbutton and the new Info and Action commands will be added to your vehicle and available on the dashboard. -
How do I switch from °C to °F, or km to miles ? The Jeedom plugin reads the settings you made in your own car and displays temperatures, distance based on units sent by your car.
Also the choice to display rated range or ideal range is following the car settings
-
The ‘wake up’ action does not wake up the car.
In the plugin configuration panel you can change the two following settings
Number of attempts to wakeup the carandNumber of seconds between two attemptsto force the wake up. TheWake upaction does better work when Always connected mode is activated in your car.
Please send any question trouble you have to vercors.io@gmail.com !